April 7, 2010

Just four items

The next section of class put us in charge of our own items. We had to come up with four items. One each that fit the category of chocolate, pastry, fruit, and custard. We picked the four items, cost out how much it costs to make them, design a plate and draw it, and then make the items. In each group, our group also has to have a four item menu, items from our individual menus. Those items were the items that went out for service on our service night in the school's restuarant. So, we needed at least 16 of our service menu item, and 1 of the other 3 items.

I spent a lot of time pouring over my cookbooks, online food blogs, and my school recipes. Everything that I made was new to me. I wanted to challenge myself and do something new, or at least, a twist on something I already knew.

The other part of this project was that we were timed. We were allowed prep time but the day of, we couldn't get into the service kitchen for plating until 6:30. We had to present 2 plates at 6:45 (one was the item for service), 2 plates at 7:00 (the service item to be sent back to our classmates for critique), and 1 item at 7:15. My group of course had Friday, the last service day but the busiest. Getting the plates ready on time was grueling. I made it on time for all 4 but it was really hard.

I will start with my service item. I called it Lemon Kissed Cheesecake. For the group and my individual menu, it was the custard item. I follow a blog called Tartelette. She makes the most amazing looking macaroons. I ended up looking through her list of recipes and came across the lemon goat cheese cheesecake with blood orange sauce and knew immediately that I had to make it. I made some minor adjustments to the recipe and made it on Monday. I made it in a muffin tin so they were mini round cheesecakes. It made 24 and I was able to make them and freeze them. Being able to do things a head of time made my life so much easier. I am so glad that I didn't have a lot to do the day before or the day of, I might have gone crazy.

With the cheesecake I made a blood orange sauce. Alan, a trooper, drove all over the place looking for juice for me so I could make it without having to juice all those oranges (for the amount I needed it would have taken more than 45 oranges). He found some and I made it! I added some sugar and reduced it in 4 pots on the stoves at school. It was pretty hilarious to see all that orangey-red stuff boiling away at the stove.

For the plate design, I decided to use a bowl. I placed the cheesecake dead center and put a swirl of sauce on top and a dallop on the side. I then added a candied pistachio and a sugar garnish, the color of lemon yellow. I am glad I made extra because we sold out of it in the restaurant, well, except for a test one, and 3 that I gave away. Everyone who tried it said it was good. I liked how it turned out and I plan on making it again. The recipe is a definite keeper! My costing estimate, the final suggested menu price to break even, was $5.03 for one serving, the goat cheese makes this a spendy one. My score on this plate was an 18/20.

My second item of the night was my pastry. I really like cream puffs. I could eat a million of them. I came across a apple inspired one in a cookbook and went with it. I called it Apple Stack. I made pâte à choux and made 2" rounds. They turned out to be closer to 4". The puffed up in the oven more than I could have expected. It was good but bad. It was the one thing I waited to make because I wanted it super fresh. I didn't have time to make it again so I used it too large. To accompany the puff, I made a pastry cream and flavored it with Applejack. Then I made a layer of spiced, caramelized apples. Then a touch more of the pastry cream. I dusted the top with powdered sugar and then set it against the stack in a bit of caramel for an anchor. I liked the taste of it a lot but the size was way out of hand. It took up so much of the plate. I also spent a couple of days figuring out a garnish of thin apple rings, I wanted to get some height on my plate. I finally got it to work and so my garnish was apple rings. I liked my garnish but disliked the size, as did Chef Hall. My score was my lowest one, 17/20. Bummer. My costing estimate, the final suggested menu price to break even, was $3.76 for one serving.

For my chocolate item I went with a full on chocolate s'more. I called it S'more in the City. I followed the school's recipe for a cheesecake crust and hand crushed my favorite cookies, Jules Destrooper Ginger Thins, and added a bit of cocoa powder and flour to it to make it pliable. Next I made chocolate marshmallows. It was a 10"X8" block. It was so fun! Then I made chocolate ganache and caramel sauce to top it. To plate it, I dusted the plate with cocoa powder, anchored the bottom crust with caramel sauce, crust, ganache, toasted marshmallow, ganache, crust, and caramel sauce. I also added a small tempered chocolate piece as my garnish. The only scary part of this was I couldn't test the marshmallow until right before I served it. It starts to get weird and hard the minute you cut into it, air just kills it. So I waited and it was scary but it turned out ok. It was fun to torch it too. I used a wooden skewer and our giant torch. Heehee. Score was 18/20. My costing estimate, the final suggested menu price to break even, was $4.82 for one serving, the cookies I used made this expensive.

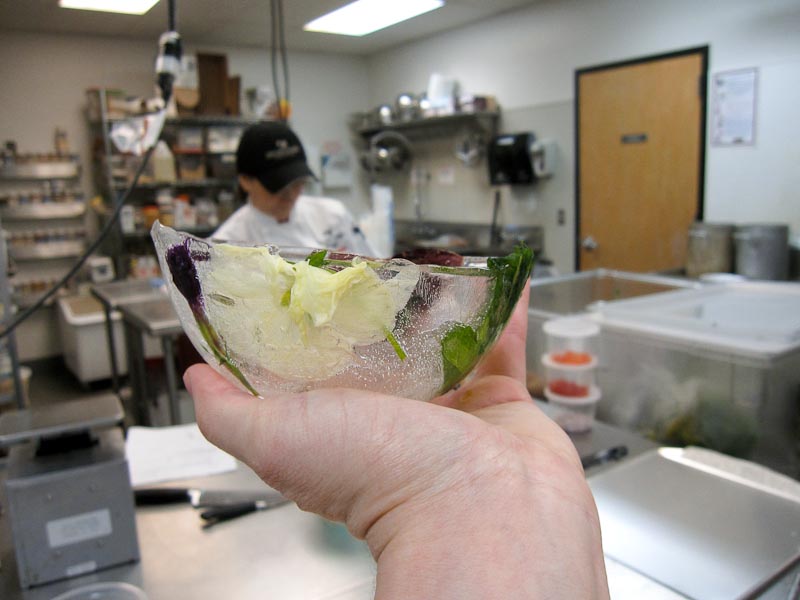
My final item was my fruit. I have always wanted to make an ice bowl and serve something cold in it. I came up with this idea to make a granite, poach some fruit, and serve it in the ice bowl. I called this one Spring Thaw. I started the bowls on Monday. I took one bowl, placed some edible flower in to it, place another bowl on top of the flowers, one that was barely smaller, and weighed it down and taped it so there was no movement. Then I filled in between the bowls with water. I carefully stored it in the freezer and walked away. The next day, I check on it and it had frozen properly! I was able to get both bowls seperated and was left with the most beautiful bowls. :) Yippee!!! The next trick was to somehow attach them to a plate. I knew I didn't want to use a sauce because you would be able to see it. I wondered if I could just freeze it to a plate. I tried it that day, and the next day, it was frozen to the plate. It was so cool.

Making the items to fill the bowl was next. I have never made granite, actually, I don't think I have ever eaten it. I think it is like a slushy but with bigger ice chunks. I was bent on reusing and not wasting during this project so I used the mixture that I poached my nectarines in to make the granite. It turned out pretty well. I wanted to ensure that it would freeze so I used baumé scale at school to measure the sugar density. I am glad I checked because it wasn't dense enough, it wouldn't have frozen. I adjusted the mixture and froze it. Then, I stirred it every now and then to get the big crystals. I really was surprised by the fruit. The nectarines we got in tasted terrible but once poached, were flavorful and tender. Poaching is genius!

I served the granite and poached nectarines in the ice bowl, with a drizzle of cremé anglaise. On the frozen plate I put a sprig of mint and a fresh edible flower for garnish. My costing estimate, the final suggested menu price to break even, was $4.90 for one serving. My score for this one still makes me tear up. I got a perfect 20/20.

My group mates had amazing items too. For our group menu Delicia made a chocolate frozen zabaglione, Katie made a poached pear that she stuffed with brie, and baked it surrounded by a sweet dough, similar to pie dough, and Rita made individual fruit tarts brimming with fresh fruit. I am sorry to say I cannot remember what all the rest of their items were.

Last week was unbelievably hard and I worked my butt off. I didn't sleep well at all. That 20/20 really made it worth it. The bowls I used to make the ice bowl, well, Ubi shoved them off the counter. They shattered into a million pieces. I am glad he did it after I used them.

We are in the final stretch. There are 2 1/2 weeks left. I am working on some exciting show pieces and a buffet of desserts. I will post about them soon.

April 3, 2010

Designing plates

The third section with Chef Hall was all about individual plating. We still had to make items. We had a list of items, garnishes, and sauces. We make the items, plate the items, and Chef scores the items.

A note about the plates, portion size, texture, flavor, composition, presentation, color, and difficulty are important. Portion size is between 3-8 oz, less ounces for richer, more for lighter. Texture is about product consistency, the thickness of sauce, and the balance of texture on the plate (crunchy, creamy, etc). Flavor is a given. Composition is about the shape, elevation (higher is better), balance of items (odd numbers are better than even) or symmetry, and placement on the plate. Presentation is about the plate being clean, no smudges, and about the lines/piping on the plate. Color is presented in harmony or contrast, natural colors only. Difficulty is the kicker. You want to include multiple techniques, close timing, and advanced garnishing. So I present to you my plates...

First up was a crème caramel, otherwise known as flan. It is not difficult to make but it is impossible to get out of our ramekins. It took me 6 to get one out that wasn't all messed up. It is a layer of caramel that you pour into the ramekin. Once set, you pour over the prepared filling. You bake it in a water bath. Once out and cool, you run a wet (it has to be wet) knife blade along the edge, turn it over on to a plate, and hopefully it will slide out onto the plate. When it slides out, some of the caramel has broken down into a sauce and it comes with it. It makes a lovely and tasty puddle all around the creamy filling. I decorated it with 3 blackberries and a sugar garnish. The sugar garnish and berries were both checkoff.

The next items was bread pudding. I have made this before with stale, scrap bread, cinnamon and raisins. I then serve it warm with a Chambord sauce. Here in class, it is pretty plain. It is also served cold. No hard sauce either. So I slide it out of the ramekin. Decorate with caramel sauce and raisins. The caramel sauce was a checkoff. I think the recipe is good but I would serve it warm. With a spicy, cinnamon sauce.

After the simple bread pudding and crème caramel, we move on to the more difficult souffles. We get to make a cream based souffle and a flourless one. My group is awesome! We got both right and when we took them out of the oven they were a good 2 inches above the ramekin. The problem is that they immediately start sinking. I decided to plate my cream based chocolate souffle 'broken' with a pool of crème anglaise (a checkoff) in the middle. mmmm.... The flourless souffle I served just plated with a dusting of powdered sugar. Alan didn't get to try these because the just deflate and get cold to fast. These must be eaten warm from the oven.


After the fun of souffle we moved on to chocolate mousse. Here we bring back our tempering chocolate skills for our garnish, or more, for the plate itself. I made a cup on a balloon. It is fun to inflate them, dip them, and then when the chocolate sets, slowly deflate it. You are left with a perfect little cup. And, if you do it right, you can make it a cool, rounded edge cup by dipping straight down then move left, right, up, down, and pull straight out. I filled my cup with the smooth chocolate mouse, topped it with a golden, sugar star, a thin chocolate arc, and a line of raspberry and mango coulis. Coulis is a sauce made from a fruit or vegetable puree. We made mango, raspberry, and eventually a kiwi one but I never actually used it.

Following mousse, we made panna cotta. Wow tasty. We have these silicon molds that make the shapes, round, square, pyramids. Our group used the rounds for panna cotta. I plated it with the raspberry and mango coulis. I went for a sun set in the water, using blueberries as the 'water.' I also feathered the mango and coulis together so it looked like flames. I really liked this dish. It was pretty, fun, and tasted so lovely.


Still in the cold items, we worked on a fruit mousse. I made a kiwi mousse with a mango glacé. We use a round, roll cake piece as a base. We then wrap a piece of acetate around the base and pipe in the mousse. Once the mousse has chilled, we make the glacé and pipe it very thin on top. We chill that until set. Then we remove the acetate band and plate it. I plated it with a couple of drops of raspberry coulis and a tower of raspberries up the side. It was pretty good, very light, smooth, and creamy.

Next up, frozen chocolate marquise. Alan and his dad Ken got to taste this, although it wasn't frozen by the time we got to it. I liked using the pyramid molds for this one. The shape is so funny and you can do so much with it. I did alternating bands of mango and raspberry coulis. Then I curled a bit of the red in to the corner of each mango line for a pretty red curl. Then I added my tempered chocolate decoration in the shape of a fan. I wanted to put the raspberry in the circle of the chocolate decoration but I was afraid of breaking it.

So here is where I forget to take a picture. We poached pears and I forgot to take a picture of the plate before Chef evaluated and tasted it. I devoured it. Without a tought. Duh. Katie, a group mate, was kind enough to let me snap a picture of her lovely plate before Chef Hall evaluated and tasted it. She decorated with blueberries on tiny piles of creme chantilly, the pear atop a mint pile, all surrounded by a cage of sugar. Good job Katie! Anyway, the pear was super delicious. I toasted the spices before adding the liquid, sweet spices, like cinnamon, cloves, anise, and a chunk of dried apricot. The pear was a really pretty red/purple color when it was done.


The day of poached pears was a bit about forgetting. Forgetting pictures and just not being with it. I volunteered to make the group ice cream. No one cared what kind so I made a orange ginger ice cream. I like the combo, I made jellies of the same flavor. It is all about getting the right amount of ginger. Orange with milky is just awesome and when you add a bite of ginger, well, nothing better. So I get the base ready and ask Chef something and I thought he said it was ready to go, I took it to the fancy ice cream machine and turned it on. It takes 6 minutes. I decided to run back and do my dishes really quick and then come back for it. I get back to class and notice another group has their base... in an ice bath. Oh man. I just put hot cream base in a really expensive school machine. Chef Hall was very kind, I could have broken the machine by overworking it. It worked out ok, my ice cream just took 7 minutes longer than normal. Jeesh. 

Anyway, I got the idea to make ice cream cones out of my caramel cookie batter (a checkoff). I made them and dipped the end in chocolate and rolled it in pistachios. The colors were just beautiful. I put a cone on the plate and I made a quenelle shape out of the ice cream and place it in front of the cone. Chef Hall said the ice cream was good. I was glad that I didn't screw up for the whole group. Yikes. On top of that, I forgot my picture on this one too. The picture of the ice cream cones is my group mate Delicia's. She also made cones. She just didn't dip them in chocolate or roll them in nuts.

Next up, sorbet. Katie had a bad day and a pink explosion for the first try at group sorbet so Rita, another mate, took a whack at try number two. It worked. Strawberry sorbet done in 6 minutes. That machine is awesome. I decide to plate it with blood orange segments, chocolate sauce, and a bit of fresh mint. The dark lines of chocolate were a nice contrast to the orange-red and pink.

Whoosh, another section complete. Next up is all about designing our own 4 item dessert menu. Then costing it out and implementing it. One item, has to go to the restaurant for service. I am still alive and will tell about it in my next post, coming soon...

March 25, 2010

The Candy, man

I was bursting at the seams with sugar last week. It was the end of the section and the first 20 days with Chef Hall. Tests, checklists, spring, my brain was just overwhelmed.

I love making candy. Some of you have been the lucky recipients of some of my experiments. Now, I have even more ideas and skills! I really enjoyed class last week, it was hard but worth it.

First up, the classic peanut brittle. Baking soda is the trick here. It is what makes it better, trust me.

Next on the list, pralines. Never had one until this class. I don't eat a lot of nuts so I don't go out of my way to find candy with nuts. These candy were weird to make. You want them to crystalize and get glossy. They are piles of tan, cloudy nuts. They are super sweet too, hurt my teeth. I gave all but a few to Chef because he likes them. I am not sure how I feel about them...

You all know I love to make soft caramel. Now, I can make soft chocolate caramel. Heehee. Alan really likes these.

I on the other hand, really like nougat. REALLY like it. I made mine with pistachios, pine nuts, dried apricot, and pepitas. So colorful and so good. I am limiting myself to a couple pieces a night just so it will last.

If you are a fan of jellies, I have the recipe for you! When we made these in class, I liked them so much I made 2 more batches! The first ones, mandarin orange with ginger. The second, peach. The third, blueberry. After you make these, you let them sit out in the air for 24 hours. Then you can roll them in citric acid. My table mate at the time, Sarah, was clever and put lime zest and salt in with her citric acid. This made the jellies even better. MMM... Think of sour patch kids with actual fruit.

Truffles, wow, these are rich. We made traditional ones and we got to choose the flavor. I went again with the orange. I can't get away from it. The truffles are so smooth and tasty. I hope that the folks who were lucky enough to get some of these babies enjoy them!

Next, we worked on tempered chocolate and filled candies. I made a caramel filling, a fondant filling flavored with coconut and lime, and I got to use the rest of my orange truffle filling on some too. I got to use a fancy geodesic dome mold. It is cool! You fill it with tempered chocolate and let it set. Then you add your filling. Then you put on some more tempered chocolate and smooth the bottom. Then you wait a minute and pop them right out. I added some luster dust so I could tell the difference in the fillings. It made them pretty and shiny.

With the left over tempered chocolate, we made some nut clusters. We had some sugar coated, toasted nuts and then you add the chocolate. Ta da! Tasty.

Then that was then end of my third section. One more section. Twenty more days. Four more weeks. Yippee!